Welcome to My Development Log
Here you can follow along with my progress and peek into my brain a bit and see my development progress
Please note the website in consistently being updated I apologize for any unpolished areas
Quick FAQ
-
The game is being developed in Unreal Engine 5
-
This will be a solo project.
-
I do not have a strict deadline, but I plan to provide weekly updates throughout the project. Alongside my other responsibilities, I will consistently advance the project.
-
My current project aims to create a fast-paced first-person shooter with dungeon-like gameplay mechanics. Players will encounter different enemies and progress through various levels, culminating in a challenging boss fight at the end. To enhance replayability and variety, I am implementing an experience system with levels, incorporating RNG elements to introduce unpredictable challenges and strategic depth.
Week 1 Overview
Day 1
Tuesday, July 23, 2024
Player Sensing Code
Implemented melee grunt enemies in Unreal Engine utilizing pawn sensing for player detection. Integrated a custom event triggered on detection, enabling enemies to dynamically follow and engage the player character.
Hit Scan Code
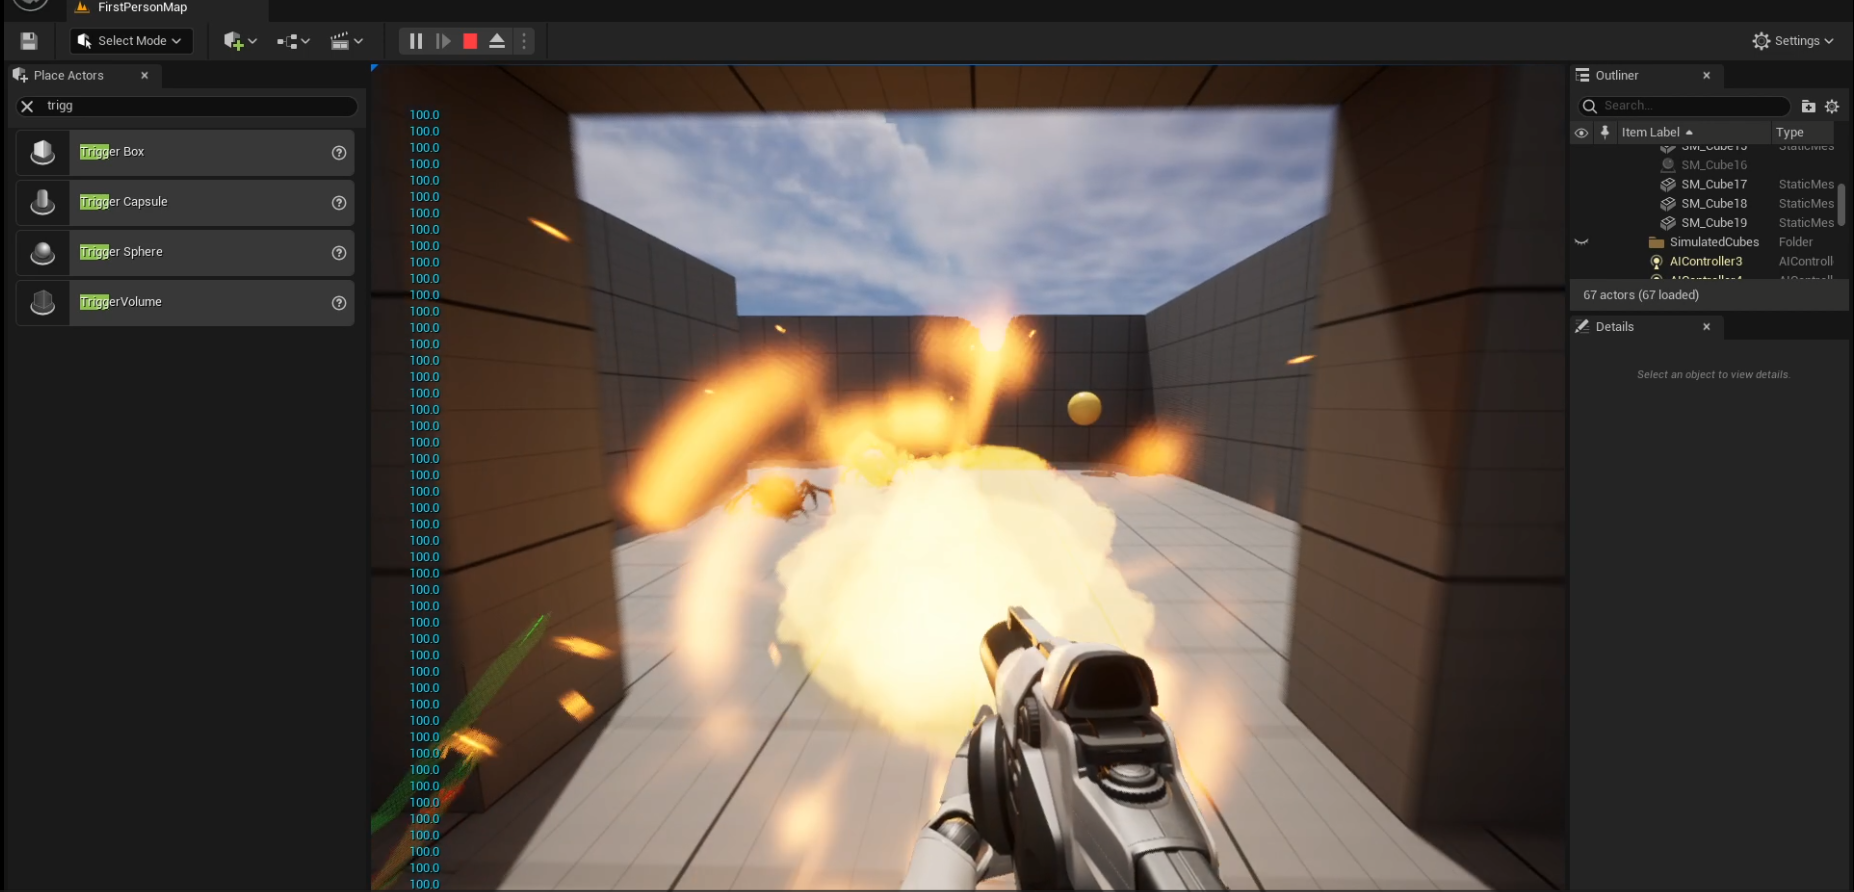
Implemented a hit scan mechanic in Unreal Engine by gathering the world location and forward vector of the camera. Utilized a line trace from the camera's viewpoint directly towards the player's aim, and processed the hit results using the "Split Struct Pin" to determine the object hit. Applied damage calculations using the "Apply Damage" node based on the identified target.
Why I Chose Hit Scan for My Game
I went with hit scan for my game because it fits the fast-paced shooter vibe perfectly no bullet drop means the action stays quick. Adding a bloom mechanic to hit scan makes shooting feel more satisfying. Plus, using hit scan is a new challenge for me, and I'm excited to learn something fresh instead of sticking with standard projectile code.
Testing a New Enemy System
I created a second enemy to experiment with a new enemy system. After testing, it looks like I'll probably need to rebuild the enemy system using a data table.
On day 1, I focused on laying the foundation by implementing an enemy type that detects the player using vision and follows them. I provided them with a basic mesh and animations, enabling them to simulate attacks when within range of the player.
After successfully implementing player detection for the enemies, I shifted my focus to developing the functionality of the gun.
To enhance the gameplay with a faster pace and a run-and-gun style, I prioritized implementing a hitscan system for immediate weapon feedback and action.
After implementing the hitscan system, I expanded day one by introducing another enemy type with increased health. Additionally, I developed an enemy health and damage system where the enemy is destroyed after taking sufficient hits.
Problems Encountered
-
P: There were some issues with the enemy animation when walking
A: I did not want to waste time this early on animation so I set simple montages to trigger when attacking and a simple idle animation otherwise
-
P: I was having difficulty getting the enemy to take damage based on the players damage variable
A: I figured out that I my Cast to player was failing so the damage was coming out NULL. I fixed the reference to call from the correct location.
-
P: Started implementing a headshot system for the humanoid enemy but would not trigger when hitting the head
A: I understand the problem is that the sphere collision on the models head is not triggering properly. I set this aside for another time
Day 2
Wednesday, July 24, 2024
On day 2, I began by finalizing the enemy health system before transitioning to work on the player health system, which currently lacks a graphical user interface (UI). To temporarily display the player's health, I utilized a PRINT STRING function.
After completing the player health system, I proceeded to implement health pickups within the game world. These pickups were designed to heal the player when they came within range.
Again, due to the absence of a graphical user interface (UI), I relied on using PRINT STRING to monitor my progress and ensure the functionality of the health pickups was working correctly.
Health Pick Up Testing
After successfully implementing health and damage systems for both the player and enemies, I proceeded to develop the next mechanic: experience points (XP). I programmed enemies to drop XP upon defeat, and when the player collects enough XP, they level up. Since there is currently no UI, I programmed the level-up to increase the player's maximum health by 10 points.
At the end of day 2, I began by placing the player in a standard grey blocked tutorial area designed to introduce game mechanics. In this area, I adjusted the enemies to minimize their damage output, providing a sense of safety while allowing players to familiarize themselves with the game's core mechanics.
Problems Encountered
-
P: After killing an enemy the exp would not spawn
A: I realized the exp was spawning but it was being picked up by the enemy instantly so it seemed like it would not spawn
I added a parameter that only the player could pick them up
-
P: Once the player collected the amount needed they would continuously level up
A: Simple fix of resetting the experience to 0 once leveled up
-
P: If the player picked up the health orb at full health they would raise their max HP
A: Another simple fix of creating a branch node to make sure the player did not exceed their max health variable
Day 3
Thursday, July 25, 2024
On Day 3, I worked on finalizing the level and experience systems, adding levels for the player and increasing the experience goal for each level.
Right after this, I worked on building a basic HUD for the player to display their health, level, and experience.
After completing the HUD, I started working on the blueprints to connect all the variables to the HUD, so it displays the player's level and experience in real time.
After this, I decided to have some fun by building animations and visuals for the HUD level-up. However, I encountered some issues that would take too much time to resolve at this stage, so I moved on to more important functions.
Then, I moved on to developing an ammo and reloading system for the gun.
I implemented a simple infinite ammo system for the gun. While I’ve noted the idea of adding pickups, it’s too early to determine if it’s the right decision at this stage.
Finally, I ended the day by creating a function that allows the player to reload their gun early, without having to empty the magazine. I encountered a few problems but nothing too serious.
Problems Encountered
-
P: Noticed that my EXP system is not the most optimized for what I'm doing in terms of code.
A: Reworked the system for more optimized coding instead of being on the player BP made its own BP for the system.
-
P: Simple flaws I noticed right away, could reload multiple times while already reloading, could reload past maximum amount.
A: Added variables and "Branch" nodes to detect if the player could reload, and a branch to detect if the players ammo has surpassed the "maxAmmo" variable.
-
P: I Couldn't figure out why the "R" key would not trigger the input action.
A: Figured out the input action can only be triggered by the player BP as my ammo and shooting system are on the Rifle BP. I called the reload function from the player BP this solved my problem.
-
P: currently there is no way to tell the gun is reloading.
A: I will start day 4 with this to give clarity when the gun is currently reloading.
Day 4
Friday, July 26, 2024
I dedicated the entire day to thoroughly cleaning up the systems I developed. I transformed them into well-structured actor components to enhance efficiency and optimize performance. This restructuring not only saves time in future development but also improves the overall quality of the blueprints.
After focusing on the systems, I shifted my attention to one of the new mechanics I’m integrating.
I updated the experience system so that experience points are now awarded per kill, rather than being collected through pickups.
Upon leveling up, the player now receives an upgrade skill point.
I initially considered automatically opening the upgrade screen upon leveling up but ultimately decided to implement upgrade towers instead. These towers can be placed around the map, allowing players to discover and choose when to upgrade. Additionally, I introduced chests that players can find to collect extra points, or they can choose to save their points for later use.
This approach also keeps players engaged in the game experience, avoiding interruptions for upgrades and steering clear of the "Vampire Survivors" style of upgrade screen. By integrating upgrade towers and collectible chests, players can remain immersed in the gameplay while still having opportunities to enhance their abilities.
I concluded the day by building the blueprints for the upgrade tower and the interaction button to open the upgrade menu. My vision is to allow players to save their points, discover additional points in chests, and access various upgrades with different point costs, introducing a "rarity" system. I also considered implementing one-time use towers to prevent players from reusing the same tower, though I'm keeping the option open for allowing unlimited use if players accumulate enough points.
Problems Encountered
-
As mentioned, most of the day was spent rebuilding and cleaning up existing systems, with no major issues encountered during this process. Similarly, the development of the towers and the pop-up upgrade menu proceeded smoothly, with no significant difficulties.
Day 5
Saturday & Sunday, July 27th & 28th, 2024
Time spent on project today = 13 hours and counting
On the fifth day, I began adding additional UI elements that I believed would serve as beneficial quality-of-life improvements.
I started by implementing enemy health bars using a widget renderer connected to my health system component, which is attached to the enemy. These bars were placed in screen space to always face the player character. However, they became visible through walls, prompting me to add a check to display them only when the player is in range and the enemy is targeting the player.
Next, I expanded on the upgrading mechanic, ensuring that when the player selects an upgrade, it deducts the corresponding skill points based on the skill's cost from the player's total.
Continuing with UI improvements, I implemented a reload indicator for the player. This involved using a progress bar that initiates a timer when the player begins reloading. By utilizing mathematical calculations based on the reload speed variable, I achieved a real-time reload UI that accurately reflects the reloading process.
Afterwards, I introduced the first skill that players unlock. This initial skill serves as a mandatory introduction to the upgrading system and teaches a core mechanic: dashing. Initially, the mechanic involved launching the player based on their facing direction, but after playtesting, it felt awkward because players had to turn around to dash effectively. To enhance movement fluidity, I revised the mechanic to dash the player based on their current velocity. This adjustment allows players to dash in the direction they are already moving, significantly improving overall gameplay experience and responsiveness.
After players unlock the first skill, Dash, I incorporated the RNG (random number generation) element for subsequent skills. This system functions similarly to what was demonstrated in the video: players accumulate enough skill points to unlock additional skills. However, a significant issue arose where the upgrade screen occasionally displayed the same skill multiple times. Addressing this has become my first major roadblock.
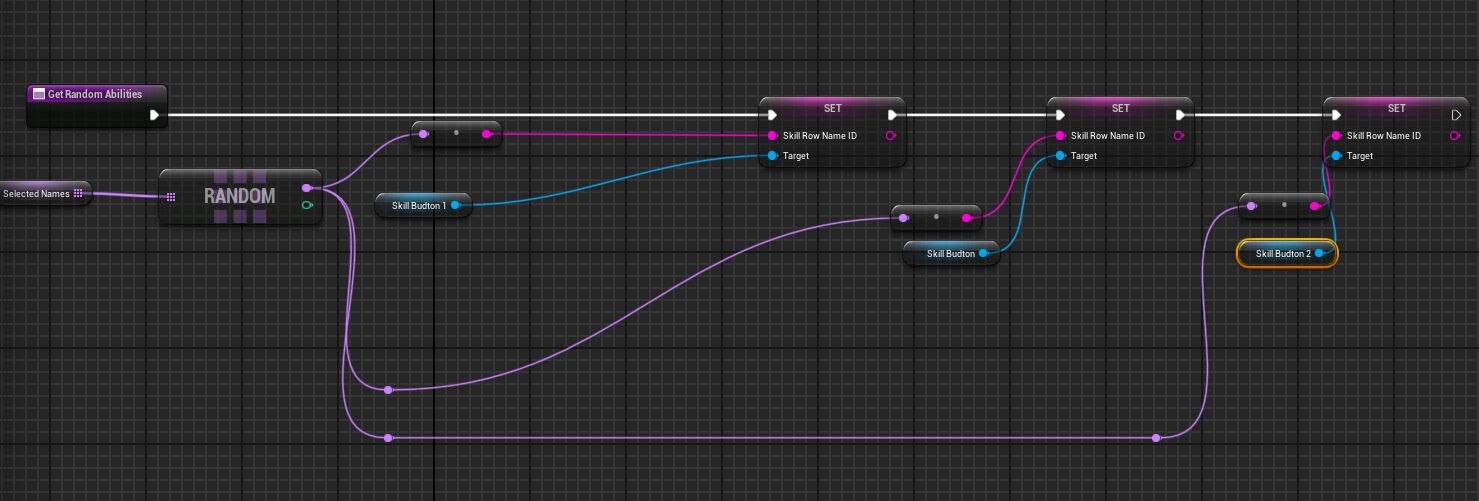
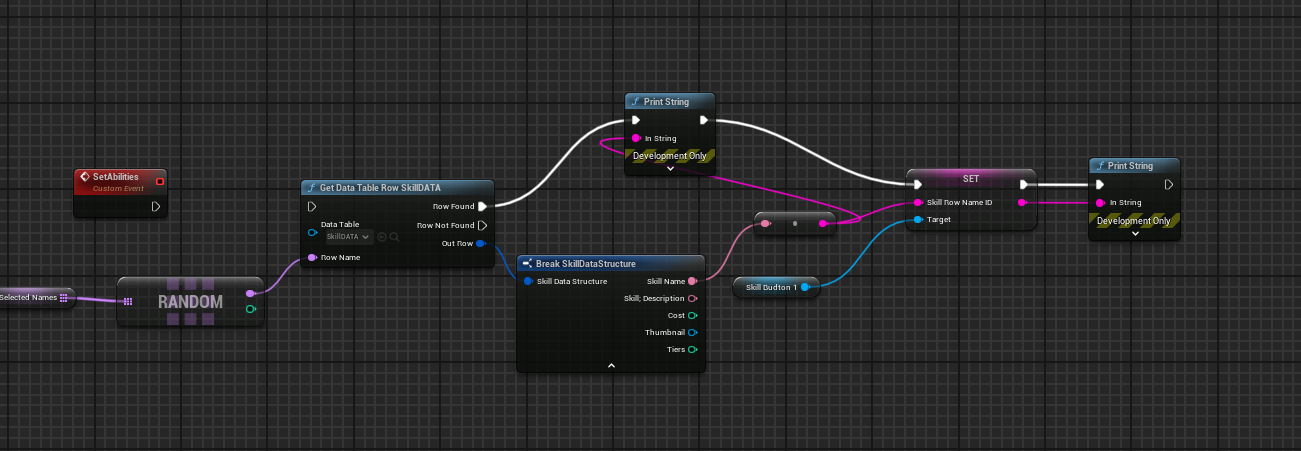
This blueprint was my initial attempt at integrating RNG into the skill system. It involves selecting a random skill from a data array and configuring the upgrade button to display the selected skill's attributes.
Unfortunately, I haven't been able to find a way to prevent it from selecting the same one again.
I started experimenting with loops, which are still new to me. Learning about them has been intriguing, especially gaining a basic understanding of how to implement them in blueprints. However, I encountered several errors along the way.
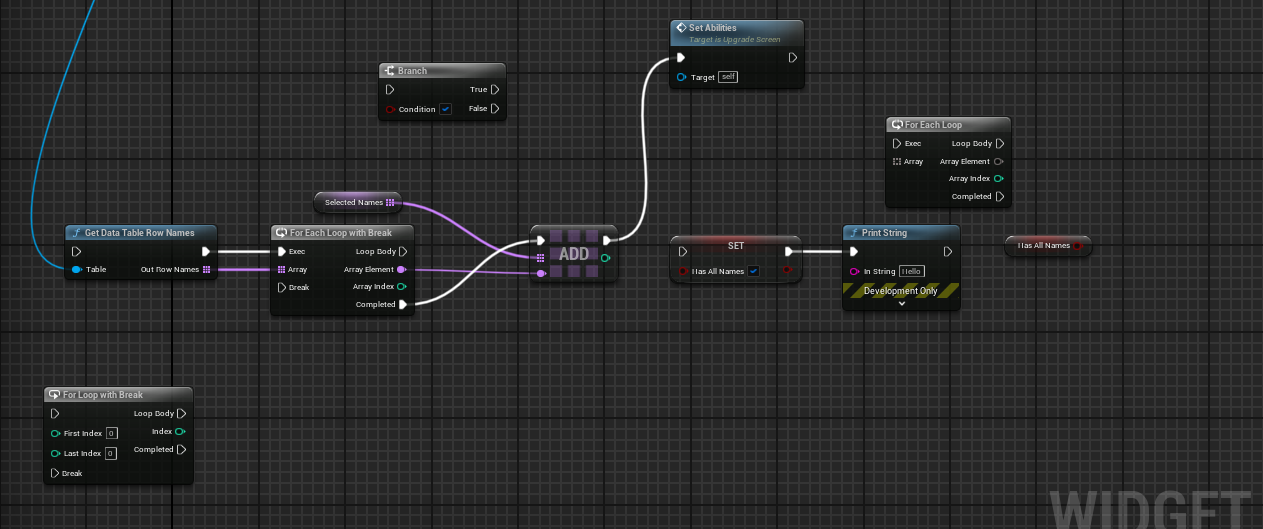
Here are more attempts to grab the index and set items, but so far, no luck.
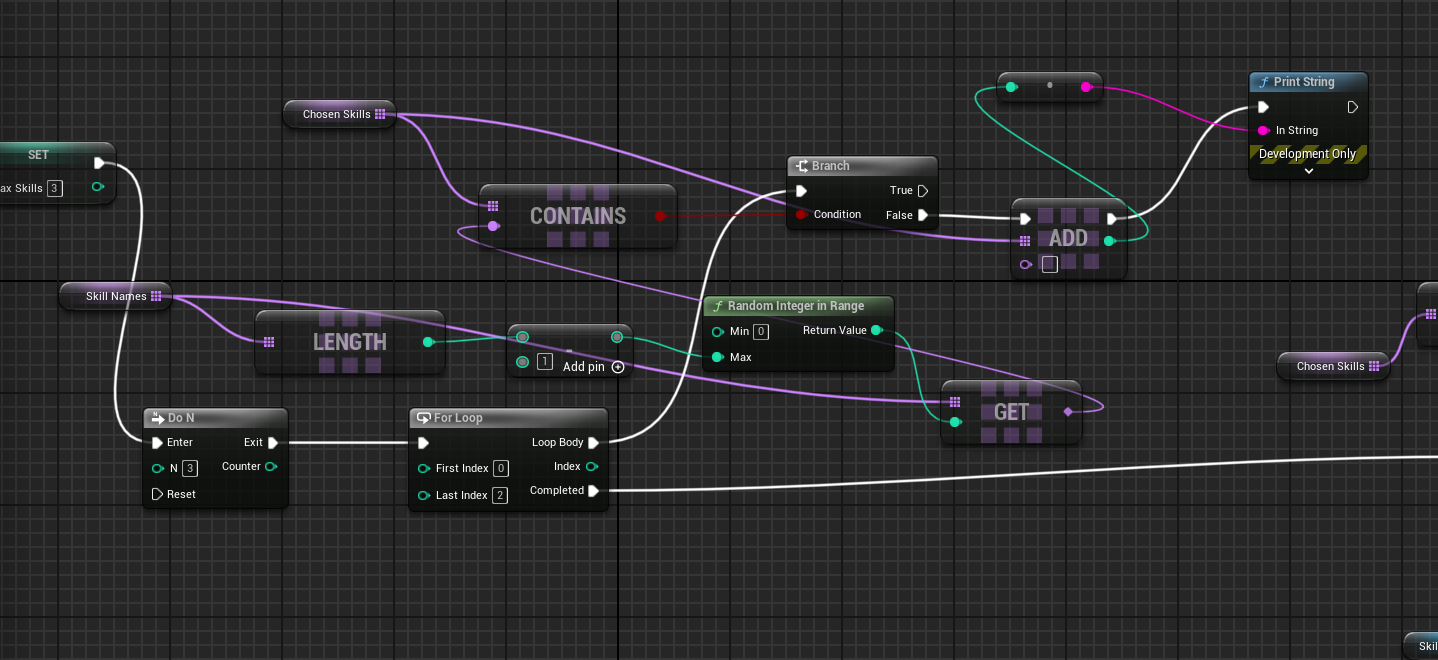
But finally, I made progress. I decided to create an empty array and fill it with three random items, ensuring they are not already in the array. Once the array has collected three unique items, the loop ends and the function begins.
This was a breakthrough because I successfully managed to retrieve three separate integers that were not already present in the array, marking the closest I've come to solving this problem.
Unfortunately, this approach did not completely solve my problem. While I successfully added integers to the array without duplicates, further debugging revealed that the array was not being filled with ability names as required by my upgrade system. The array appeared to be empty after the loop completed, despite being filled during the loop iteration. I still need to find a solution to this issue.


